
Fat
Dough
710 results found with an empty search
- Mulled Wine
Jump To Recipe Jump To Video I know Xmas is over but since some of you lovely people have been asking what did I cook for my Xmas dinner, I decided to share these dishes. When I saw @kerrylaifatt posted her mulled wine recipe, I know I have to make my own. You can check out her version: Pretty neat right? As she had mentioned that her recipe was too citrusy, so I omit the orange juice instead. I used 2 types of citrus for an extra flavor profile. To kick things up a notch, I also added some spiced rum. Lastly, with a bit of chefy touch for the presentation. You can totally enjoy the mulled wine without it and it will be fine. Cheers! Ingredients: Inspired by @kerrylaifatt (Serve 4) Red Wine, 750ml Spiced Rum, 50ml Brandy, 325ml Pure Vanilla Paste, 1 TSP Orange Peels, 1/2 Orange Lemon Peels, 1/2 Lemon Demerara Sugar, 50g Cloves, 1/2 TBSP Cinnamon Sticks Preferably Hexa , 2 Green Cardamoms, 1/2 TBSP Star Anise, 2 Nutmeg Freshly Grated, Pinch Presentation (Optional): Lemon Slices, 4 Granulated Sugar, For Brûlée Orange Peels Thinly Stripped, 4 (Reserve The Orange Segments) Cinnamon Sticks Preferably Hexa , 4 Equipment: Heavy Pot Blowtorch (Optional) Directions: In a heavy pot, add in all the ingredients. *Be sure to discard any seeds from the lemons and oranges.* Give it a stir to combine everything. Turn the heat up to medium-high. Bring it up to a simmer and cook for 15 mins or until the sugar has completely dissolved. *Do not bring it up to a boil.* Turn the heat down to the lowest setting, cover and steep for 1 hr. *It should be barely simmering.* This is optional: Spoon granulated sugar over the lemon slices. Using a blowtorch and brûlée until caramelized. Set aside. Tie a knot with orange peel strips onto cinnamon sticks. Trim off any excess. Place the cinnamon sticks into individual wine glasses. Use a blowtorch to burn the cinnamon sticks until smokey. Immediately cover the glasses to prevent the smoke from escaping. When ready to serve, remove the cinnamon sticks and slide in the reserved orange segments (from the orange peel strips). Pour in the mulled wine. Place the burned cinnamon sticks into the glasses. Slide the brûléed lemon slices at the side of the glasses. Lastly, top it off with star anise. Cheers! Recipe Video:
- Ube Halaya Coffee
Jump To Recipe Jump To Video Someone requested that I should put this as an actual written post here. You asked and you shall receive. And what can I say? This is perhaps the only reel I am proud of so far, despite the messy pour. Lol! As I had said before, Filipinos use ube halaya on almost anything, even on coffee. This is like the Avocado Coffee drink, you have to try and see if it is your palate. Ingredients: (Serve 1) Ube Halaya Homemade , 100g Ube Extract, A Few Drops Evaporated Milk Preferably Chilled, 150g Freshly Brewed Coffee, 150g Latik Homemade , For Garnishing Equipment: Blender Directions: Please visit my " How To Make Latik " page for the recipe. Please visit my " Ube Halaya Toast " page for the recipe. In a blender, add ube halaya, ube extract and milk. Blitz until well combined. *You can add some sweetener of your choice desired. Condensed milk works really well.* Pour into a serving glass. Pour coffee over the top and garnish with some latik. Cheers! Beautiful layers... Recipe Video:
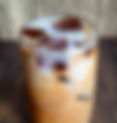
- Vietnamese Iced Coffee
Jump To Recipe Jump To Video On my journey, I met lots of incredible people on all social media platforms. And this beverage is inspired by 3 lovely people; @emma_sweets_life , @vincehomemade and John Bissonette. I am not a fan of sweetened or iced coffee. But just once every 6 months, I would indulge myself in some. Just once or maybe more. I also included the parts of a Vietnamese coffee dripper down below, so you would understand the jargon as stated in the directions. Let's get started. Ingredients: Inspired by @emma_sweets_life , @vincehomemade and John Bissonette. (Serve 1, sadly) Freshly Brewed Coffee, 2 Servings Sweetened Condensed Milk, 3 TBSP Adjust To Preference Coffee Granules, 8g Boiling Water, For Coffee Whole Milk, For Coffee Equipment: Vietnamese Coffee Dripper Ice Cube Tray Directions: Pour freshly brewed coffee into an ice cube tray. *You can use a normal coffee maker or a moka pot to brew your coffee.* Freeze in the freezer until frozen solid. Once the coffee ice cubes are frozen, add condensed milk into a serving cup. Place the spanner onto the cup. Followed by the chamber. Add coffee granules into the chamber. Give it a light shake to even out. Place the insert on top of the coffee. Pack it down tightly. *If your insert is the screw-on type, screw it down tightly and release it just a bit.* Add 1 to 2 TBSP of boiling water into the chamber. *Water has to be boiling.* Let it sit for 30 secs. Pour boiling water into the chamber in a circular motion. Fill it up just below the brim. Place on the cap and watch it drip. Once the dripping stop, remove the cap and place it upside down on a table. Remove the dripper and place it onto the cap. Give the coffee a stir to combine well. Remove the coffee ice cubes and add to another serving glass. Pour the condensed milk coffee over the ice cubes. Fill the glass with some milk. Cheers! I am not sure the exact Vietnamese names for the parts tho... Recipe Video:
- Coffee Avocado Slide
Jump To Recipe Jump To Video If you watched my previous Reel or TikTok, you will know the story behind this recipe. My ex-gf is the one who introduced this amazing combination into my life. The avocado rush on the palate, the strong aromatic coffee aftertaste, almost mocha-like lingers at the back of your mouth for quite a while. Someone from TikTok requested a proper recipe, so here it is. The cold coffee avocado soaked with coconut dark chocolate just gives your tastebuds an oomph sensation. To take things even further, I garnish with some coffee granules. The taste is almost the same as my 1st sipped into this wonderful combination that my ex-gf used to make. I really hope you will give this recipe a try. Ingredients: (Serve 1) High Quality Dark Chocolate Preferably Valrhona or Callebaut, 50g High Quality Coconut Oil, 20g Freshly Brewed Coffee, 240g Sweetened Condensed Milk, 50g Adjust To Preference Avocado, 1 Coconut Rum, 2 TBSP Ice Cubes, A Handful Coffee Granules, For Garnishing Equipment: Blender Double Boiler Directions: Melt chocolate on a double boiler . Once the chocolate has melted, remove it from heat. Stir in the coconut oil. Mix until well combined. The mixture should have a glossy shine. Brush the chocolate mixture on the walls of the serving glass. Add 1 TBSP or more into that glass. Set aside until ready to use. Add coffee, condensed milk, avocado, rum and ice into a blender. Blitz until smooth. Pour the coffee avocado mixture into the serving glass. Garnish with some coffee granules. Serve immediately. Give this a try! Recipe Video:
- Dalgona Coffee
Jump To Recipe Jump To Video Since I am on a dalgona roll, why not make some actual dalgona coffee? This takes me back to that viral trend timeline. Everyone was jumping on the bandwagon and dalgona coffee was flooding across all social media platforms. Very much like the Basque Burnt Cheesecake and the Sourdough craze. I had explained the origins in my previous Dalgona Overnight Oats recipe. You can check it out if you are intrigued. In the meantime, let's indulge in this awesome coffee. Ingredients: (Serve 1) High Quality Instant Coffee Preferably Little's , 5g Granulated Sugar, 15g Water, 15g Whole Milk or Any Milk of Your Choice, 240g Coffee Liqueur, 1 TBSP or More Raw Cacao Nibs, For Garnishing Equipment: Hand / Stand Mixer Directions: n a large bowl, add instant coffee, sugar and water. Stir to dissolve the coffee and sugar. Use a hand or stand mixer, and whip the coffee mixture until stiff peaks. It will take 10 to 15 mins. Pour milk into a serving glass. Drizzle in the coffee liqueur. Spoon the dalgona coffee over the milk. Sprinkle some cacao nibs over the top. You can serve this immediately or chill it in the fridge until cold. Nostalgic... I'd forgotten how good this tastes... Recipe Video:
- Vietnamese Frappé Martini
Jump To Recipe Jump To Video @vincehomemade is responsible for this recipe and I don't think I can ever look at a typical espresso or coffee martini again. Lol! He was throwing some ideas after he saw my previous Vietnamese Iced Coffee recipe. I was intrigued by this one in particular. So here we are. I used the same coffee ice cubes method, only this time, it is used to shake the cocktail. I didn't add any condensed milk as coffee liqueur is used. You can add if desired. I just find it a bit too sweet and overpowering, in my humble opinion. Anyway, I know it is like 8 in the morning, but who is judging? Cheers! Ingredients: Inspired by @vincehomemade (Serve 1, sadly) Freshly Brewed Coffee, 2 Servings Ice Cubes Coffee Granules, 8g + More For Garnishing Boiling Water, For Coffee Coffee Liqueur, 1 oz Vodka, 1 oz Equipment: Vietnamese Coffee Dripper Ice Cube Tray Martini Glassware Cocktail Shaker Directions: Pour freshly brewed coffee into an ice cube tray. *You can use a normal coffee maker or a moka pot to brew your coffee.* Freeze in the freezer until frozen solid. When about to serve add some normal ice cubes into martini glassware to keep it chilled. Place the spanner onto a serving cup. Followed by the chamber. Add coffee granules into the chamber. Give it a light shake to even out. Place the insert on top of the coffee. Pack it down tightly. *If your insert is the screw-on type, screw it down tightly and release it just a bit.* Add 1 to 2 TBSP of boiling water into the chamber. *Water has to be boiling.* Let it sit for 30 secs. Pour boiling water into the chamber in a circular motion. Fill it up just below the brim. Place on the cap and watch it drip. Once the dripping stop, remove the cap and place it upside down on a table. Remove the dripper and place it onto the cap. *You can find out more about the Vietnamese dripper parts here .* Add the frozen coffee ice cubes into a cocktail shaker, followed by the Vietnamese coffee. Add in the coffee liqueur and vodka. Slam the lid tightly and shake until well combined and foamy. Discard the ice cubes from the glassware and strain the martini into the glassware. Garnish with some more coffee granules. Cheers! Cheers! Recipe Video:
- Orange Vietnamese Coffee
Jump To Recipe Jump To Video This beverage is inspired by Dan McLaughlin aka @softpourn . You can check out his videos on TikTok for awesome coffee ideas. I am not sure what to think of this coffee; it is a love or hate affair. At 1st sip, I thought it was bizarre, but the more sips I drank, I began to like it in a weird way. This is the kinda beverage that you need to give a shot at and find out for yourself. It is all up to your palate. This is not the original recipe. This is just my inspired version, you have to check it out on @softpourn 's TikTok page for the original recipe (sadly, I cannot find the direct link). If I am not wrong, he uses espresso, ice cubes, orange slices and sparkling water. I hope you will give this idea a try. Cheers! Ingredients: Inspired by Dan McLaughlin aka @softpourn (Serve 1, sadly) Orange Slices, For Ice Cubes Fresh Orange Juice, 1 Orange Coffee Granules, 8g Boiling Water, For Coffee Sparkling Water, For Coffee Equipment: Vietnamese Coffee Dripper Ice Cube Tray Directions: Pour some water into an ice cube tray. Slice the orange slices into small triangles and sink them into the water. Freeze in the freezer until frozen solid. Once the coffee ice cubes are frozen, place the spanner onto a cup. Followed by the chamber. Add coffee granules into the chamber. Give it a light shake to even out. Place the insert on top of the coffee. Pack it down tightly. *If your insert is the screw-on type, screw it down tightly and release it just a bit.* Add 1 to 2 TBSP of boiling water into the chamber. *Water has to be boiling.* Let it sit for 30 secs. Pour boiling water into the chamber in a circular motion. Fill it up just below the brim. Place on the cap and watch it drip. Once the dripping stop, remove the cap and place it upside down on a table. Remove the dripper and place it onto the cap. Pour the coffee into a pitcher and set it aside. Add the orange ice cubes into a serving cup. Pour in the orange juice, followed by Vietnamese coffee. And lastly, some sparkling water to fill up the cup. Give it a stir and enjoy. Cheers! Will you give it a try? Recipe Video:
- Vietnamese Mocha Martini
Jump To Recipe Jump To Video Here's another recipe inspired by @vincehomemade . We were having a little chat after our last endeavor ( Vietnamese Frappé Martini ); I guess we were just throwing ideas in the air. I decided to put this intriguing idea into fruition. And I am so glad I did. This is definitely not for the faint of heart as this is super intense with dark chocolatiness with a coffee kick. There is a little surprise after drinking: a dark chocolate truffle (for anyone who you are making this beverage for). I hope you will give this crazy idea a try. Cheers! Ingredients: Inspired by @vincehomemade (Serve 1, sadly) Freshly Brewed Coffee, 2 Servings Ice Cubes Coffee Granules, 8g Boiling Water, For Coffee Dark Chocolate Liqueur Preferably Mozart , 1 oz Vodka, 1 oz Dark Chocolate Truffle Preferably Lindt , 1 Raw Cacao Nibs, For Garnishing Equipment: Vietnamese Coffee Dripper Ice Cube Tray Martini Glassware Cocktail Shaker Directions: Pour freshly brewed coffee into an ice cube tray. *You can use a normal coffee maker or a moka pot to brew your coffee.* Freeze in the freezer until frozen solid. When about to serve add some normal ice cubes into martini glassware to keep it chilled. Place the spanner onto a serving cup. Followed by the chamber. Add coffee granules into the chamber. Give it a light shake to even out. Place the insert on top of the coffee. Pack it down tightly. *If your insert is the screw-on type, screw it down tightly and release it just a bit.* Add 1 to 2 TBSP of boiling water into the chamber. *Water has to be boiling.* Let it sit for 30 secs. Pour boiling water into the chamber in a circular motion. Fill it up just below the brim. Place on the cap and watch it drip. Once the dripping stop, remove the cap and place it upside down on a table. Remove the dripper and place it onto the cap. *You can find out more about the Vietnamese dripper parts here .* Add the frozen coffee ice cubes into a cocktail shaker, followed by the Vietnamese coffee. Add in the dark chocolate liqueur and vodka. Slam the lid tightly and shake until well combined and foamy. Discard the ice cubes from the glassware and place the chocolate truffle into the glassware. Strain the martini into the glassware. Garnish with some raw cacao nibs. Cheers! Cheers! Recipe Video:
- Hummus
Jump To Recipe Jump To Video I know that there are thousands upon thousands of hummus recipes out there. But this is my go-to hummus recipe. It never fails to impress me every time I make it, and it also never ceases to amaze me whenever I have it. I'm not bragging. Even my youngest daughter, who is a meat lover, adores this vegan dish. I honestly find that it yields better results with fresh chickpeas as compared to canned ones. But if you are in a rush, feel free to use canned ones. The trick is to add cold water while the ingredients are blitzing away in the food processor. You have to judge the amount of cold water to add because different brands of chickpeas react differently. The end result is a creamy and smooth consistency. If you desire a mashed-potatoes-kinda-smooth consistency, I would recommend a stick blender instead of a food processor. I would always top my hummus with some shatta oil to sorta bring everything together. And of cos, I would suggest serving this lovely hummus with some Angie's Tempeh Chips (if you are residing in Singapore). Ingredients: (Serve 4) Chickpeas, 125g Baking Soda, 1/2 TSP Tahini, 135g Fresh Lemon Juice, 1/2 Lemon Garlic, 2 Cloves Cold Water, 50g or More Sea Salt, Pinch Black Pepper, Pinch Shatta Homemade , 1 TBSP Good Quality Extra Virgin Olive Oil, 1 TBSP Pita / Angie's Tempeh Chips Preferably, For Serving Equipment: Sauce Pot Food Processor Directions: Please visit my " How To Make Shatta " page for the recipe. In a bowl, add chickpeas and water. Make sure that the chickpeas are fully submerged. Cover and set aside overnight. The next day, the water should almost dry out and the chickpeas should be slightly doubled in size. Drain and discard the liquid. Transfer the chickpeas into a sauce pot. Add in baking soda and 800g of water. Turn the heat up to medium and give it a stir until the baking soda has dissolved. Bring it up to a simmer. Turn the heat down to low and continue cooking for about 30 to 40 mins, or until the chickpeas are soft. *Remove any foam and skins that float to the top. Add more hot water if necessary.* *If you are using canned chickpeas, skip the above process.* Once the chickpeas are cooked and softened, drain and discard the liquid. Transfer the chickpeas into a food processor and blitz. Add in the tahini, lemon juice and garlic. Blitz. While blitzing, stream down the cold water. You should get a creamy and smooth consistency. *Add more cold water if necessary.* Transfer into a serving bowl. Taste and adjust for seasoning with salt and pepper. In another small bowl, combine shatta and olive oil. Drizzle the shatta mixture over the hummus. Serve immediately with some pita or preferably Angie's Tempeh Chips . You can keep it chilled in the fridge for up to 3 days. Sit at room temperature for 30 mins before serving. Angie's Tempeh Chips ... You can use pita, but if you are in Singapore, why not give Angie's Tempeh Chips a try? Recipe Video:
- Vietnamese Mocha
Jump To Recipe Jump To Video Ever since my Vietnamese Mocha Martini recipe, I can never look at Mocha the same way again. I blame it all on the genius @vincehomemade . I have to make Mocha with Lindt dark chocolate truffles and I don't think I can make Mocha any other way again. This is because this is super chocolatelicious! This is what I want from a Mocha beverage; a coffee kick, chocolatey, almost like a hot chocolate, but it is not. You should know what I'm trying to say. Anyway, let's raise a toast. Cheers! Ingredients: Inspired by @vincehomemade (Serve 1, sadly) Coffee Granules, 8g Boiling Water, For Coffee Dark Chocolate Truffle Preferably Lindt , 6 or More Whole Milk, For Serving Cocoa Powder, For Dusting Equipment: Vietnamese Coffee Dripper Milk Frother Directions: Place the spanner onto a serving cup. Followed by the chamber. Add coffee granules into the chamber. Give it a light shake to even out. Place the insert on top of the coffee. Pack it down tightly. *If your insert is the screw-on type, screw it down tightly and release it just a bit.* Add 1 to 2 TBSP of boiling water into the chamber. *Water has to be boiling.* Let it sit for 30 secs. Pour boiling water into the chamber in a circular motion. Fill it up just below the brim. Place on the cap and watch it drip. While the coffee is dripping, transfer the chocolate truffles into a serving cup and set it aside. Froth and steam milk. Once the dripping stop, remove the cap and place it upside down on a table. Remove the dripper and place it onto the cap. *You can find out more about the Vietnamese dripper parts here .* Pour the coffee over the chocolate truffles. Followed by the milk. Spoon some milk foam over the top and dust with some cocoa powder. Cheers! Cheers! Recipe Video:


Recipe Index
By Cuisine
Vietnamese
By Dish Type
By Main Ingredients
By Other Special Collections