
Fat
Dough
654 results found with an empty search
- Poire Belle Hélène Chocolate Cake
Jump To Recipe Jump To Video My favorite part of a full coarse meal is the dessert. If a restaurant fails at its dessert, then it fails as a whole. I mean, who doesn't love desserts? Do not trust anyone who doesn't; those are the real sociopaths. Lol. Just kidding. Anyway, this is the last dish I had served for a lunch event. Here's a snapshot. A simple Poire Belle Hélène. I was wondering if I had done justice to the classic French dessert. I decided to research more online; actually, I am looking for other ways to incorporate the poached pear. Then I stumbled upon Bruno Albouze 's version. I was completely blown away and I immediately stormed into action and made this. The only problem with that is you cannot unmold the cake; you have to serve it as it is, on a serving plate, bowl or in ramekins. So, I decided to serve it as a whole. You can make this version for Valentine's Day so that you can share this with your significant other. Or if you are like me, who doesn't like sharing food, you can serve these up on separate ramekins. The best part is you can prep the poached pears in advance. During V Day, you just need to prepare the chocolate batter and bake. Anyway, all the detailed directions are down below. Give this recipe a go and surprise your beloved this V Day. Happy Valentine's Day! Ingredients: Inspired by Bruno Albouze (Serve 8) Poached Pears: Water, 1.5 L Light Muscovado Sugar, 100g Granulated Sugar, 100g Cinnamon Stick Preferably Hexa , 2 Star Anise, 4 Cloves, 2 Lemongrass White Part Only Smashed, 2 Grand Marnier / Cognac, 2 TBSP Fresh Orange Zest, 1 Orange Ginger Smashed, 1 Inch Pears Preferably Conference Pears, 8 Lava Cake: High Quality Dark Chocolate Preferably Valrhona or Callebaut, 150g Unsalted Butter Softened, 113g Sea Salt, Pinch Grand Marnier / Cognac, 2 TBSP Fresh Orange Zest, 1/2 Orange Cayenne, Pinch Eggs, 2 Demerara Sugar, 100g Corn Flour, 50g Garnishes: High Quality Cocoa Powder Preferably Valrhona or Callebaut, For Dusting Edible Gold Dust, For Dusting Raw Cacao Nibs, For Garnishing Fresh Mint, For Garnishing Equipment: Sauce Pot Oven Melon Baller Double Boiler Oven Proof Ramekins / Bowls / Plates / 3.5" Pastry Rings Directions: Poach the Pears In a saucepan over medium heat, add water, sugar, cinnamon, star anise, cloves, lemongrass, liqueur, orange zest, and ginger. Stir until sugar dissolves. Simmer on low for 30 minutes. Peel pears and core bottoms using a melon baller or small knife. Immediately place pears into the syrup to prevent oxidation. Add just enough water to submerge pears, if needed. Cover with a round cut of parchment paper. Simmer gently on low for 30 minutes. Let the pears chill in the syrup overnight, parchment paper intact. Make the Lava Cake Batter Preheat oven to 230°C (450°F). Melt chocolate over a double boiler , then remove from heat and add butter. Stir until smooth. Stir in salt, liqueur, orange zest, and cayenne. Set aside. In another bowl, whisk egg and sugar until combined. Whisk in ⅓ of the chocolate mixture to temper, then combine with the remaining chocolate. Sift and fold in cornflour in two portions. Mix until smooth. Prepare Molds Grease ramekins or line pastry rings with parchment. Fill ¾ full with batter. If using bowls, note that cakes cannot be unmolded after baking. Initial Bake and Assembly Bake for 8 minutes until edges are set and center is jiggly. Drain pears from syrup ( save syrup for tea ). Place one pear into each mold. Flatten pear bottoms if plating. Bake an additional 5 minutes. To Serve Sprinkle cocoa powder and edible gold dust over the top. Garnish with cacao nibs and mint. Serve immediately while warm. Super chocolaty, not for the faint of heart... Surprise your beloved with this dessert on V-Day... Recipe Video:
- Kung Pao Chicken | 宫保雞丁
Jump To Recipe Jump To Video This dish is originated in China, Sichuan province. This is a classic dish in Sichuan cuisine that uses chicken as its primary ingredient. What makes this dish so unique is the usage of Sichuan peppercorns. The peppercorns are famous for their spicy and numbing effects on the palate. There're lots of different variations across China and America. Today I am using an American-Chinese cooking technique; the chicken is finely diced and cooked on low heat for under 3 mins. You must be wondering "why low heat?" This is because if the chicken is cooked on high heat, it will lose its tender juiciness while cooking. The trick is to dice the chicken small and uniformly. You can use a wok if you have one. I am using my skillet so that you lovely people know that this dish can be done in a skillet or pan. This is a rather spicy dish. Don't say I didn't warn ya. My daughters, despite not eating anything spicy, devoured this dish within mins. They said, "this is spicy but it tastes so good." Ingredients: (Serve 4) Chicken: Chicken Thigh Boneless, 4 or 400g Soy Sauce, 1 TBSP ShaoXing / Hua Tiao / Sherry Wine, 1 TBSP Corn Starch, 1 TBSP Sesame Oil Oil, 1/2 TBSP Sea Salt, Pinch White Pepper, Pinch Mushroom Powder, Pinch Sauce: Demerara Sugar, 2 TBSP ShaoXing / Hua Tiao / Sherry Wine, 1 TBSP Soy Sauce, 1.5 TBSP Sea Salt, Pinch Chili Oil , 1 TBSP Adjust To Preference Chili Powder, 1 TSP Chicken Stock, 1/4 Cup Kung Bao Chicken: Peanuts, 75g Sea Salt, Pinch White Pepper, Pinch Canola / Peanut / Vegetable Oil, 1 TBSP Sichuan Peppercorns, 1/2 TSP Dried Chilies Coarsely Sliced, 12 Adjust To Preference Garlic Finely Minced, 3 Cloves Ginger Finely Minced, 1/2 Inch Green Onion Finely Sliced, 3 Stems + More For Garnishing Slurry, 1 TSP Potato Starch + 1 TSP Water Black Vinegar, 2 TBSP Equipment: Cast Iron Skillet / Pan Oven Directions: Please visit my " How To Make Chili Oil " page for the recipe. Marinate the Chicken Remove the skin from chicken thighs and reserve for later. Dice the chicken into small 1 cm (⅓ inch) pieces. In a separate bowl, mix marinade ingredients until fully dissolved. Pour the marinade over the chicken and toss to coat. Cover and refrigerate for at least 1 hour. Prepare the Sauce In a bowl, mix all sauce ingredients until fully combined. Set aside. Roast the Peanuts and Chicken Skin Preheat oven to 180°C (355°F). Season peanuts with salt and spread on a tray. Bake for 15–20 minutes until toasted and skins loosen. Rub in a kitchen towel to remove skins. Set aside. Lay reserved chicken skin on a parchment-lined tray. Season with salt and pepper. Cover with parchment and weigh it down. Bake for 15–20 minutes or until golden and crispy. Set aside. Cook the Kung Pao Chicken Heat oil in a skillet over low heat. Add peppercorns and dried chilies. Sauté until aromatic, about 30 seconds. Stir in garlic and ginger. Sauté until fragrant. Add marinated chicken and spread out in the skillet. Cook for 30 seconds, then flip and cook another 30 seconds. Increase heat to medium. Add green onion and sauté briefly. Stir in the sauce and cook for 30 seconds. Add cornstarch slurry and cook another 30 seconds, stirring until thickened. Remove from heat. Stir in roasted peanuts and black vinegar. Fold to combine. To Serve Transfer the Kung Pao Chicken to serving plates. Top with crispy chicken skin. Garnish with green onions. Serve immediately. Super chickenlicious... Recipe Video:
- My Grilled Pizza: Bak Kwa
Jump To Recipe Jump To Video Besides making Bak Kwa Sambal Nasi Goreng with leftover bak kwa (from Lunar New Year), this is also another staple in my household. My kids love it. This year, I decided to take @one_beer_per_mile 's advice and my homemade chili oil on pizzas. Does it work? Hell yeah! That chili oil adds a subtle hint of spicy kick which enhances the flavors. Thank you Justin ! This pizza had a bit of history: it started out as an oven-baked pizza with some mozzarella and parmigiano. After many years of making this pizza, it has evolved into what it is today. I am still finding ways to perfect home kitchen oven-baked pizzas. It is still far as compared to wood fire pizzas. Let's hope I am able to nail it in the future (fingers crossed). For now, let's grill some pizzas. Ingredients: (Make 4 grilled pizzas) Crème Fraîche, 60g Fromage Blanc, 80g Garlic Finely Grated, 1 Clove Ginger Finely Grated, 1/2" Sea Salt. Pinch White Pepper, Pinch Chili Oil , 1 TSP + More For Drizzling Grilled Pizza Dough, 4 Sesame Oil, For Brushing Bak Kwa Finely Diced, 2 Slices or More Red Onion Finely Sliced into Rings, 1 Green Onions Finely Chopped, For Garnishing Equipment: Griddle / Grill Smoking Gun (Optional) Directions: Please visit my " Grilled Pizza Dough " page for the recipe. Please visit my " Bak Kwa " page for the recipe. In a mixing bowl, add crème fraîche, fromage blanc, garlic, ginger, salt, pepper and chili coil. Mix until well combined. Set aside in the fridge until ready to use. Once you have rolled out your pizza dough, brush the dough with sesame oil using a pastry brush. *Remember to use a fork and gently poke all over. This is crucial as it will prevent the crust from puffing.* In a griddle over medium heat, gently place in the dough oiled side down. Carefully and gently, using your hands to press down the dough to make sure the whole dough sits fully on the griddle. Brush the top with sesame oil. Grill until the bottom is almost charred. Flip and immediately turn the heat down to medium-low. Spread a thin layer of that crème fraîche mixture over the pizza dough evenly. When you think it is not enough, it is enough. Less is always more. Scatter bak kwa and red onion slices over the top. Immediately cover the griddle to generate steam, for about 3 to 5 mins. Remove the cover, the bottom should be lightly charred. Remove the pizza from the heat and transfer it onto a serving plate. Sprinkle scallions over the top and drizzle chili oil in a spiral motion over the pizza. Repeat the steps for the remaining pizzas. If you have a smoking gun and would like to infuse more smoky flavors, now it's the time. Infuse with some smoking wood chips (I'm using apple wood) for about 5 mins. Slice and serve immediately. Less is always more... A beauty isn't it? Recipe Video:
- Kung Pao Veg | 宫保蔬菜丁
Jump To Recipe Jump To Video My eldest daughter requested this version of Kung Pao dish. She became a vegetarian 2 years ago (guess she is following her dad's footsteps) and she always loved my Kung Pao Chicken (even tho it is spicy for her palate). I stumbled upon ChefSteps video on YouTube. It was at that exact lightbulb moment that this dish is born. I used the ingredients and recipe for this veg version and it failed epically. It is too gooey and lumpy without any flavors, so I tried a different approach discarding the starches. replacing some ingredients and implementing more flavors. I am glad that it works like a charm! I also decided to serve this on some fried Vietnamese rice paper. I am certain that once you tried frying the rice paper, you will never look at it the same way again. It is perhaps the crispiest food that you will ever eat. Give this veg version a try and you will be amazed. Ingredients: Inspired by ChefSteps (Serve 4) Veg: Shiitake Mushrooms Coarsely Sliced, 400g Cauliflower Coarsely Sliced, 800g Pecans / Walnuts, 200g Marinade: Sesame Oil Oil, 1/2 TBSP Soy Sauce, 1 TBSP ShaoXing / Hua Tiao / Sherry Wine, 1 TBSP Liquid Smoke Preferably Stubb's , 2 TBSP Sea Salt, Pinch Black Pepper, Pinch Mushroom Powder, Pinch Sauce: Maple Syrup Preferably Grade A, 2 TBSP ShaoXing / Hua Tiao / Sherry Wine, 1 TBSP Soy Sauce, 1.5 TBSP Chili Oil , 1 TBSP Adjust To Preference Vegetable Stock, 60ml Smoked Paprika, 1 TSP Cayenne, Pinch Sea Salt, Pinch Kung Pao Veg: Canola / Peanut / Vegetable Oil, 2 TBSP + More For Frying Sichuan Peppercorns, 1/3 TSP Dried Chilies Coarsely Sliced, 6 Adjust To Preference Garlic Finely Minced, 3 Cloves Ginger Finely Minced, 1" Scallions Finely Sliced, 3 Stems + More For Garnishing Cashew Nuts Roasted, 50g Black Vinegar, 2 TBSP Vietnamese Rice Paper, 4 (Optional) Fresh Coriander Coarsely Chopped, For Garnishing Equipment: Cast Iron Skillet / Pan Oven Food Processor Directions: Please visit my " How To Make Chili Oil " page for the recipe. Make the ChefSteps -Inspired Veg Mix Preheat oven to 70°C (160°F). Spread mushrooms and cauliflower on a parchment-lined tray. Bake for 2½ hours until dry. Blitz in a food processor until coarsely ground— don’t over-blend into a paste . Transfer to a large mixing bowl. Blitz pecans until coarsely ground and add to the bowl. Mix well using a 1:2:4 ratio of nuts, mushrooms, and cauliflower. Measure out 200g for this recipe and set aside. The rest can be frozen. Marinate the Veg Mix Combine 200g of the veg mix with the marinade ingredients in a large bowl. Mix until well combined. Cover and refrigerate until ready to use. Prepare the Sauce In a bowl, mix all sauce ingredients until fully combined. Set aside. Cook the Kung Pao Veg In a skillet over medium heat, add oil. Add peppercorns and dried chilies. Sauté until aromatic and toasted. Strain and discard peppercorns and chilies. Return oil to skillet. Add garlic and ginger. Sauté until fragrant. Add scallions and sauté briefly. Add marinated veg and sauté for 30 seconds. Increase heat to medium. Pour in the sauce and cook until liquid evaporates, stirring occasionally. Remove from heat. Add roasted cashews and black vinegar. Fold to combine. Set aside. Fry the Vietnamese Rice Paper Heat about 1" of oil in a skillet over medium-high heat. Check readiness with a wooden chopstick—bubbles should form around it. Drop in a sheet of rice paper. It will puff instantly. Remove and drain. Repeat with remaining rice paper. Assemble and Serve Place crispy rice paper on serving plates. Spoon the Kung Pao Veg on top. Garnish with coriander. Serve immediately. 1 part pecan, 2 parts mushrooms and 4 parts cauliflower. Fantastic plant-based alternative. A flavor bomb! Recipe Video:
- Chile Verde
Jump To Recipe Jump To Video If you noticed my previous Kung Pao Veg recipe, I talked about how I stumbled upon ChefSteps video on YouTube. I am gonna use the same veg-nut concoction for this recipe as well. I really pondered why it took me so long to post any Mexican recipe; because this tastes super yummilicious even without all the meat! I couldn't get my hands on any Jalapeño, so I am using a mixture of Japanese Shishito peppers and green chili padi. The combination does make up for the spiciness. Feel free to explore with different types of green chilies, you are after all the artist and the plate is your canvas. I learned a very simple trick from my Mexcian friend (who is an excellent cook) by soaking tortilla into seasoned oil (on low heat), which not only keeps the tortilla warm but also adds flavors. Just a few seconds will do. In closing, I hope you will give this vegan Chile Verde a try. Ingredients: Inspired by ChefSteps (Serve 4) Veg: Shiitake Mushrooms Coarsely Sliced, 400g Cauliflower Coarsely Sliced, 800g Pecans / Walnuts, 200g To Blitz: Shishito Peppers Halved Deseeded, 4 Green Chili Padi Halved Deseeded, 2 Or Jalapeño Halved Deseeded, 5 Tomatillos Halved, 5 Vegetable Stock, 3/4 Cup Shishito / Jalapeño, 1 Fresh Lemon Zest, 1/2 Lemon Fresh Lemon Juice, 1/2 Lemon Parsley / Coriander, A Handful Taco Seasoning Homemade or Hexa , 1 TBSP To Cook: High Quality Olive Oil, 2 TBSP Yellow Onion Finely Sliced, 1 Sea Salt, Pinch Black Pepper, Pinch Granulated Sugar, Pinch Garlic Finely Minced, 3 Cloves Vegetable Stock, 1/4 Cup + 1/2 Cup Mushroom Powder, Pinch Taco Seasoning Homemade or Hexa , 1 TBSP Tacos: Grapeseed / Sunflower / Peanut / Canola Oil, 3 TBSP Taco Seasoning Homemade or Hexa , 1 TBSP Tortilla Homemade , 4 Pickled Green Chilies / Jalapeño Finely Chopped Homemade , A Handful Equipment: Cast Iron Skillet / Pan Oven Blender Directions: Please visit my " How To Pickle Almost Anything " page for the recipe. Please visit my " How To Make Tortilla " page for the recipe. Please visit my " How To Make Taco Seasoning " page for the recipe. Prepare the Veg-Nut Mixture Preheat oven to 70°C (160°F). Spread mushrooms and cauliflower on a parchment-lined baking tray. Bake for 2½ hours until dry and slightly golden. Blitz in a food processor until coarsely ground—avoid turning into a paste. Pulse pecans until coarsely ground and mix with the mushroom-cauliflower blend. Combine using a 1:2:4 ratio of nuts, mushrooms, and cauliflower. Measure out 200g of this mixture and set aside. Make the Tomatillo Sauce Broil tomatillos and peppers on a tray for 15–20 minutes until charred. Transfer to bowls and cover with cling film. Let steam for 15 minutes. Peel off the skins and transfer flesh to a blender. Add the remaining sauce ingredients and blitz until smooth. Set aside. Cook the Filling Heat olive oil in a skillet over medium heat. Add onion, season with salt, pepper, and sugar, and sauté until translucent. Stir in garlic and cook until aromatic. Deglaze with ¼ cup of vegetable stock. Add the tomatillo sauce and stir to combine. Season with salt, pepper, and mushroom powder. Stir in another ½ cup vegetable stock, the veg-nut mixture, and taco seasoning. Cook until thickened. Taste and adjust seasoning. Remove from heat. Prepare the Tortillas Mix oil and taco seasoning in a small bowl. In a skillet over low heat, warm the oil mixture. Soak tortillas in the oil for 5–10 seconds per side. Transfer to a serving plate. Repeat with the rest. Assemble and Serve Spoon the filling onto the tortillas. Garnish with pickled chilies. Serve immediately. 1 part pecan, 2 parts mushrooms and 4 parts cauliflower. Fantastic plant-based alternative. A flavor bomb... Yummilicious! Recipe Video:
- Risotto allo Zafferano
Jump To Recipe Jump To Video I have a question for you lovely people: what is your purpose in scrolling thru' your social feed? I scroll mine to get inspiration. As I was scrolling on my TikTok, I stumbled upon @larabellamyers' recipe about risotto cooked in a saffron concoction (I paid attention to her feed cos she was searching for Italian rice in Singapore). Do check her out. Anyway, I was so intrigued by the whole idea that I decided to do some research. I am actually flabbergasted that this dish is quite well known in Italy, and I wonder why I have not seen or heard of this. I quickly realized that I am barely scratching the surface when it comes to Italian cuisine. Food is just like music. It is vast and almost limitless. We need to learn the rules in order to cook/bake properly. Then we forget the rules and cook/bake from our hearts. Do make your own vegetable stock. It will make all the difference. I hope you will give this simple yet sophisticated recipe a try. Ingredients: Inspired By @larabellamyers (Serve 2) Vegetable Stock Homemade , 375ml or More Saffron, A Fat Pinch Granulated Sugar, Pinch High Quality Olive Oil, 2 TBSP Shallot Finely Minced, 3 Or Red Onion Finely Minced, 1 Sea Salt, Pinch White Pepper, Pinch Arborio Rice, 125g White Wine, 50ml Unsalted Butter, 15g Parmigiano Reggiano, 25g Parsley Finely Chopped, For Garnishing Equipment: Cast Iron Skillet / Pan Sauce Pot x 2 Mortar & Pestle Directions: Please visit my " How To Make Vegetable Stock " page for the recipe. Prep the Stock and Saffron Keep vegetable stock warm in a small pot over low heat. Grind saffron and sugar into powder using a mortar and pestle. Add 1 ladle of stock to the powder, stir to dissolve, and let infuse. Sauté the Aromatics In a skillet over medium heat, add 1 TBSP olive oil. Sauté shallots or red onion with salt and pepper until translucent. Remove from heat and set aside. Cook the Risotto In another pot, heat 1 TBSP olive oil. Add rice and toast lightly until warm to the touch. Pour in white wine. Stir and cook until nearly evaporated. Add 1 ladle of stock. Stir and cook until absorbed. Add saffron stock and sautéed shallots. Stir until combined. Continue adding stock one ladle at a time, stirring constantly until creamy and rice is al dente. Avoid adding more than 1 ladle at once. Finish and Serve Once risotto is creamy and tender, remove from heat. Stir in butter and freshly grated Parmigiano. Taste and adjust with salt and white pepper. Serve hot, garnished with parsley. Silky, creamy, chewy, yummilicious... Recipe Video:
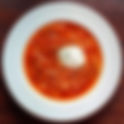
- Borscht | борщ
Jump To Recipe Jump To Video Amidst the war that is going on between Russia and Ukraine, I thought I share some Russian and Ukrainian recipes as a peace offering. I do not wanna get political over here. Let's just say I see the world differently from my own perspective. 2 people can look at the sunset and have 2 different points of view. Traditionally, Borscht is made from beef or pork stock, by boiling meat and bones in water; it has lots of variations throughout the regions of Ukraine and Russia. This is my version. I made my borscht from vegetables and instead of meat, I used cannellini beans. You can also make this 100% vegan by omitting the sour cream. Making your own stock does take a bit of time and effort, but it makes a lot of difference; I prepared my stock the day before. You can create your own version of Borscht by using chicken stock and shredded chicken breast or other cuts of meat. There are also Meatballs Borscht! The possibilities are vast. Ingredients: (Serve 4) Beetroots, 4 Saute: High Quality Olive Oil, 2 TBSP Yellow Onion, 1 Sea Salt, Pinch Black Pepper, Pinch Granulated Sugar, Pinch Garlic, 3 Cloves Carrots Grated, 2 Large Tomato Sauce, 100g Soup: Vegetable Stock Homemade , 2L Yukon Gold Potatoes Peeled Finely Wedged, 2 Carrots Oblique Cut, 1 Large Cabbage Shredded, 1/4 Cannellini Beans, 1 Packet / Can Serve: Sour Cream, 4 Dollops Dried Dill, For Garnishing Equipment: Cast Iron Skillet / Pan Large Heavy Pot Directions: Please visit my " How To Make Vegetable Stock " page for the recipe. Roast the Beets Preheat oven to 200°C (400°F). Wrap beets in foil and roast for 40–45 mins until fork-tender. Let cool, then peel and grate into a bowl. Set aside. Sauté the Vegetables Heat olive oil in a skillet over medium heat. Add onion, season with salt, pepper, and a pinch of sugar. Cook until lightly caramelized. Stir in garlic and cook until aromatic. Add carrots, season again, and cook until softened and color deepens (about 15 mins). Stir in tomato sauce and cook until well combined. Set aside. Prepare the Soup In a large pot, bring vegetable stock to a simmer. Add potatoes and carrots. Cook until fork-tender. Stir in cabbage, then add grated beetroot and drained beans. Season with salt and pepper to taste. Add sautéed vegetables and ½ cup water. Bring to a simmer. Cover and cook 15–20 mins, or until slightly thickened. Optional: For a thicker soup, cook an additional 15–20 mins, stirring occasionally. To Serve Serve warm or chill overnight for a cold version. Top each bowl with a dollop of sour cream and a sprinkle of dried dill. Hearty and yummilicious... Recipe Video:
- Chicken Kiev | котлета по-київськи
Jump To Recipe Jump To Video Yes, as I'd said in my previous post, I will be making some Russian and Ukrainian recipes during this wartime. Very much like Borscht, the history of this dish isn't well documented. It is rumored that some Russian chefs have adapted some French culinary techniques to create this dish. It even has a French name: côtelette de volaille. The goal of this dish is to prevent the butter from leaking during the shallow frying process. To do that, we need to perform a simple trick. Nothing magical, it is to seal the stuffed chicken breast with a rolled tender and coat it well with seasoned flour, egg and breadcrumbs (I used Japanese panko for extra cwispiness). The most important step is to allow the stuffed chicken breast to rest, chilled in the fridge before frying. I used a very traditional route that kept the drumlet attached to the chicken breast. You can ask a butcher for help, watch some YouTube tutorials or even discard the idea if you wanna save yourself some hassle. Yes, chicken breast with the drumlet intact works fine too. Ingredients: (Serve 2) Unsalted Butter Softened, 80g Parsley Finely Chopped, A Handful Garlic, 3 Cloves Sea Salt, Pinch White Pepper, Pinch Dried Mushroom Powder, Pinch Nutmeg Freshly Grated, Pinch Chicken Breast with Drumlet Attached, 2 Unbleached All Purpose Flour, 1/4 Cup For Dredging Cayenne, Pinch Egg, 1 High Quality Japanese Panko, For Dredging Sunflower / Peanut / Vegetable Oil, For Frying Spinach, 200g (Optional) Radish Finely Sliced, For Garnishing (Optional) Equipment: Cast Iron Skillet / Pan Directions: Prepare Garlic Butter Mix softened butter with minced garlic (smashed with salt), parsley, pepper, mushroom powder, and nutmeg. Chill until firm. Prep the Chicken Debone chicken, keeping breast and drumlets intact. Remove tenders and pound them thin. Butterfly the chicken breast. Place a dollop of garlic butter in the center. Wrap with the breast and seal using the tender. Repeat for remaining pieces. Bread the Chicken Prepare three bowls: Flour, salt, pepper, mushroom powder, cayenne Beaten egg with a splash of water Panko breadcrumbs Dredge chicken in flour → egg → panko → egg → panko. Make sure all sides are sealed well. Chill for 30 mins to set. Fry the Chicken Heat 2 inches of oil in a skillet over medium heat. Fry chicken until golden on one side, then flip and baste. Cook through and transfer to a wire rack or paper towels to drain. Repeat for all pieces. Optional Garnish Sauté spinach with leftover garlic butter. Serve chicken with radish and buttered spinach. To Serve Plate and serve chicken immediately while hot and crispy. Tender, juicy, succulent... Recipe Video:
- Golubtsi | Голубцы
Jump To Recipe Jump To Video I am gonna use the same veg-nut concoction (inspired by ChefSteps ) for this Russian recipe too. It took me a while to decide what kinda fillings for this awesome Russian rolled cabbage dish. I figured that the rest of the ingredients will not go well with ground chicken (as you all know that I do not consume other cuts of meat like beef, mutton or pork), so a vegetarian option might be a better idea. Agree? Why vegetarian? Butter is used. You can of cos replace the butter with any vegan option to make this dish 100% vegan. Golubtsi originated as a way to use any leftover food. It consists of cooked cabbage leaves wrapped around a variety of fillings. I have heard that different households actually prepare Golubtsi with their own unique fillings and sauces. The filling traditionally consists of ground beef, lamb or pork which is typically seasoned with garlic and onion. Grains such as rice or barley can often be included in the filling as well. Make your own Golubtsi fillings! Helen Rennie is a genius! I also discovered an excellent way to reheat any leftover Golubtsi from Helen Rennie . If you do not know who she is, it is time to check her YouTube channel out. Give her a follow while you are at it. I know it is a long process. But it is kinda therapeutic to take the mind off from this troubled world, right? Anyway, in closing, this is my humble version of Golubtsi and I hope you will enjoy making this dish as much as eating it as I do. Ingredients: Inspired by ChefSteps & Helen Rennie (Serve 12) Veg: Shiitake Mushrooms Coarsely Sliced, 400g Cauliflower Coarsely Sliced, 800g Pecans / Walnuts, 200g Fillings: White Cabbage, 1 About 1.5kg Sea Salt, Pinch Basmati / Jasmine Rice Washed, 100g Yellow Onion Coarsely Sliced, 1 Garlic Coarsely Minced, 5 Cloves Celery Coarsely Sliced, 2 Ribs Unsalted Butter, 45g Silken Tofu, 300g Panko, 30g Mushroom Powder, 1 TBSP Black Pepper, 1 TBSP Nori Flakes, 1 TBSP Stew: High Quality Olive Oil, For Cooking Sea Salt, Pinch Black Pepper, Pinch Shallots Finely Sliced, 5 Granulated Sugar, Pinch Carrots Grated, 2 Large Yukon Gold Potatoes Grated, 2 Garlic Finely Minced, 3 Cloves White Wine, 120ml Canned Tomatoes, 2 Cans / 800g Balsamic Vinegar, 2 TBSP Dried Dill, For Garnishing Equipment: Cast Iron Skillet / Pan Oven Food Processor Heavy Sauce Pot Directions: Prepare the Veg-Nut Base Roast cauliflower and mushrooms at 70°C (160°F) for 2.5 hrs. Pulse roasted veg in a food processor until coarse. Blitz pecans and combine with veg. Use a 1:2:4 ratio of nuts:mushrooms:cauliflower. Measure out 500g for the filling. Prep the Cabbage Core cabbage and boil in salted water, cored side down. Peel off layers as they soften. Set aside to cool. Reserve smaller or damaged layers separately. Prep the Rice and Filling Boil rice for 10 mins. Blitz onion, garlic, celery, and butter into a paste. Mix with veg-nut blend, tofu, panko, mushroom powder, seasonings, and cooked rice. Taste and adjust seasoning. Roll the Cabbage Add 2 TBSP of filling onto a cabbage leaf. Roll tightly, folding sides in. Place seam-side down. Stack smaller leaves to use for extra rolls if needed. Prep the Stew Base Thinly slice leftover cabbage and sauté with olive oil until caramelized (15 mins). Remove, then sauté shallots with salt, pepper, and sugar. Add carrots, potatoes, garlic, wine, cabbage, and tomatoes. Finish with balsamic vinegar. Adjust seasoning. Bake the Rolls Preheat oven to 165°C (325°F). Layer stew and cabbage rolls in a pot: 1/4 stew → rolls → repeat up to 3 layers. Cover with reserved cabbage leaf or parchment. Add lid. Bake for 1 hr or until rolls are tender (skewer inserts easily). Serve Spoon stew onto plates. Place rolls on top. Garnish with dried dill. Optional – Pan-Seared Finish Chill leftover rolls. On serving day, sear seam-side down in olive oil until crisp. Baste with butter. Rest. Reheat stew with a splash of water. Plate with seared rolls and garnish. 1 part pecan, 2 parts mushrooms and 4 parts cauliflower. Fantastic plant-based alternative. Helen Rennie's way of cwisping up the leftover rolled cabbage... Sure beats ground chicken... Recipe Video:
- Pampushky | Пампушки с чесноком
Jump To Recipe Jump To Video To be honest, this is actually my 3rd try at making this Ukrainian bread. I tried researching several recipes online and my 1st two attempts failed. The first was way too dense and didn't puff up in the oven. At the second attempt, it over-puffed in the oven, thus resulting in an ugly shape (you don't wanna know). I am glad that I never give up and decided to try again. Ya know what they said, 3rd is the charm. History has it that the making Pampushky points back to the German cuisine. These buns were likely created by the German colonists in Ukraine back in the 19th century. It has evolved into what it is today as a Ukrainian traditional dish. The word "Pampushka" can be used to describe a gorgeous plump woman. Lol! IKR? These Pampushky are usually served with Borscht or Kapustnyak. I am going a bit on an unorthodox way by using butter instead of oil to smear onto the bread once it comes outta the oven. Yes! A high quality salted butter! You will thank me later. This is rather an easy straightforward bread recipe, there's no excuse for you not to make it. Ingredients: (Make one 6 inch) Whole Milk, 120g Active Instant Dry Yeast, 3/4 TSP Demerara Sugar, 4g Unbleached All Purpose Flour, 180g Sea Salt, 3g Egg Lightly Beaten, 25g Grapeseed / Peanut / Sunflower / Canola Oil, 32g + More For Greasing High Quality Salted Butter, 30g Garlic Finely Minced, 3 Cloves Dried Dill, Pinch Equipment: Cast Iron Skillet Sauce Pot Oven 6" Pastry Ring / Springform Cake Pan / Cast Iron Skillet Directions: Make the Dough Warm milk in a pot until lukewarm (36.5°C / 100°F). Stir in yeast and sugar until dissolved. Set aside. In a large bowl, mix flour and salt. Make a well in the center. Pour in the milk mixture, then add egg and oil. Mix until a dough forms. Knead in the bowl for 5 mins until smooth. If too dry, add water 1 TBSP at a time. If too sticky, add flour 1 TBSP at a time. Transfer to a floured surface and knead another 5 mins until elastic and passes the window-pane test . Lightly oil the bowl and place the dough inside. Cover and let rise for 1 hr or until doubled. Shape & Bake Punch down the dough. Divide into 8 equal pieces. Roll each piece into a tight ball. Arrange the balls in a greased pastry ring on a parchment-lined tray. Cover with a damp towel and proof for 30 mins. Preheat oven to 175°C (350°F). Brush dough with egg wash. Bake for 30–35 mins until golden brown. Make Garlic Butter While baking, melt butter in a skillet. Pour melted butter over minced garlic in a bowl. Add dried dill and stir well. Finish & Serve Brush hot bread with garlic butter as soon as it comes out of the oven. Spoon any remaining butter mixture over the top. Let cool slightly, unmold, and serve warm—perfect with Kapustnyak. Look at the beautiful crumbs... Recipe Video:


Recipe Index
By Cuisine
Vietnamese
By Dish Type
By Main Ingredients
By Other Special Collections