
Halloween Special: Noir Cookies | Black Cocoa & White Chocolate Halloween Cookies

About These Noir Cookies
What It Is: Halloween-inspired black cocoa cookies loaded with creamy white chocolate, finished with flaky sea salt and decorated with two mischievous edible candy eyes.
Cuisine: American-style chocolate chip cookies with a Halloween twist, featuring black cocoa powder for their distinctive dark appearance and deep cocoa flavor.
Servings: Approximately 15–16 cookies, portioned at 60g each.
Cooking Method: Creaming butter and sugar, folding in dry ingredients and white chocolate, chilling the dough, and oven-baking.
Estimated Time: Approximately 25–30 minutes of preparation, several hours or overnight chilling, 14–16 minutes of baking per batch, and 30 minutes of cooling.
Flavor & Texture: Deep, roasted black cocoa flavor balanced by creamy, sweet white chocolate and a touch of flaky sea salt. Lightly crisp edges with soft, chewy centers.
What Makes This Version Different: Unlike traditional chocolate chip cookies, Noir Cookies use heavily alkalized black cocoa powder to achieve their dramatic, almost-black appearance without artificial food coloring. The white chocolate provides a creamy contrast, while two small edible candy eyes add a playful Halloween touch. The recipe was refined through several experiments to balance flavor, texture, and appearance.
Equipment: Oven, hand mixer or stand mixer, mixing bowls, spatula, kitchen scale, baking tray, parchment paper, and an optional round cookie cutter or pastry ring for shaping.
Halloween is here, and I thought, why the fuck not share my Noir cookie recipe? After all, this is what Fat Dough is supposed to be about. Sharing recipes, experimenting with ingredients, making mistakes and hopefully inspiring someone to get into the kitchen.
Noir started as part of my Halloween cookie collection, alongside a rather ambitious blue matcha cookie. The original idea was to create something playful, a little spooky and different from my usual chocolate chip cookies.

Well, things didn't exactly go according to plan. The blue matcha experiment failed, my first attempt at Noir didn't deliver the flavor I wanted, and the oversized edible eyes were completely overpowering the cookies. I had to rethink the whole thing.
Sometimes an idea looks fantastic in your head, but once you actually make it, reality has other plans.
The inspiration behind Noir comes from black cocoa, the deeply coloured cocoa powder commonly associated with the dark chocolate wafers of cookies such as Oreos. Black cocoa is heavily alkalized, giving it that distinctive almost-black appearance and a different flavour profile from ordinary natural cocoa powder.

But here's the thing: black cocoa alone doesn't automatically make something taste like an Oreo, and I learned that through experimenting. I wanted a cookie that could stand on its own rather than simply imitate something else.
So I paired the black cocoa with white chocolate, creating a contrast between the dark, roasted cocoa notes and the creamy sweetness of the chocolate. The little edible eyes came back too, only much smaller this time. They're supposed to make the cookies look mischievous, not become the main attraction.

And now, instead of keeping the recipe to myself, I'm sharing it. These are buttery black cocoa cookies with white chocolate throughout, lightly crisp edges, soft centres and a little flaky sea salt to balance the sweetness.
They're not complicated to make, although I strongly recommend chilling the dough before baking. The edible eyes are optional, of course. Leave them off and you've got yourself a dark chocolate cookie that works long after Halloween is over.
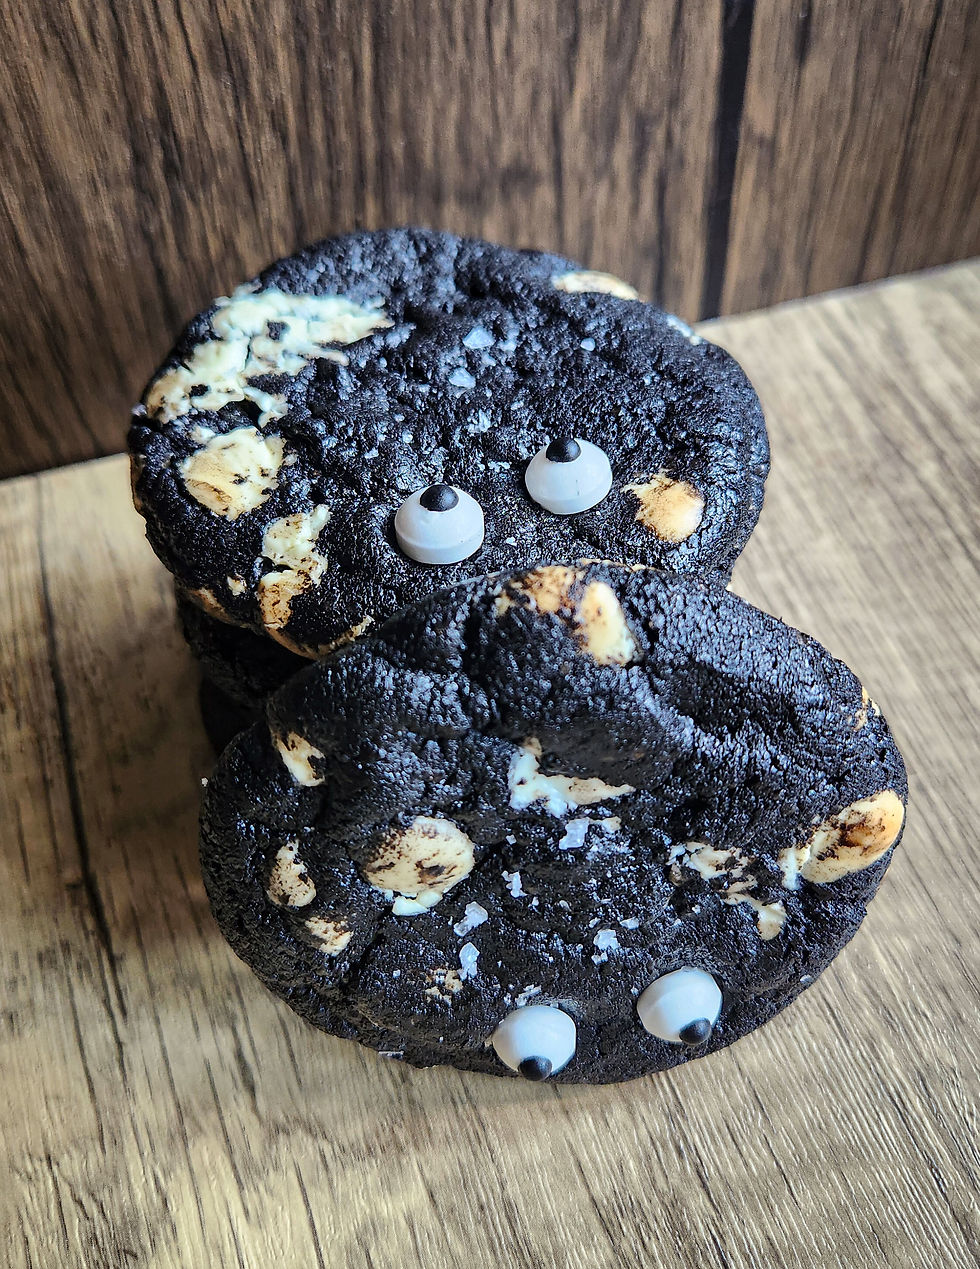
But since it's Halloween, I say give them those ridiculous little eyes and have some fun. If you've been following my cookie experiments, you'll know that not everything I make works the first time.
Noir is a reminder that sometimes you have to fail, make adjustments and try again. That's part of cooking, and that's exactly why Fat Dough exists.

Ingredients:
(Make 15 cookies)
Unbleached All Purpose Flour, 185g
Sea Salt, 1 TSP
Baking Soda, 1/2 TSP
Black Cocoa Powder, 65g
Unsalted Butter Softened, 167g
Brown Sugar, 134g
Granulated Sugar, 104g
Molasses, 12g
Beaten Eggs, 60g
Vanilla Paste, 1 TSP
High Quality White Chocolate At Least 28% Preferably Callebaut or Valrhona, 214g
Flaky Sea Salt, Pinch
Edible Eyes, 30
Equipment:
Oven
Hand / Stand Mixer
Directions:
In a mixing bowl, combine the all-purpose flour, sea salt, baking soda and black cocoa powder. Stir thoroughly until evenly distributed, breaking up any visible cocoa lumps. Set aside.
Add the softened unsalted butter to a large mixing bowl. Using a hand mixer or stand mixer fitted with a paddle attachment, beat until smooth and creamy, roughly the consistency of mayonnaise.
Add the brown sugar and continue beating until well incorporated and the mixture becomes lighter and fluffier.
Add the granulated sugar and continue mixing until the butter and sugars are thoroughly combined. Scrape down the sides and bottom of the bowl occasionally so everything mixes evenly.
Add the molasses and mix until incorporated.
Pour in the beaten eggs and vanilla paste. Mix until combined, scraping down the bowl as necessary. If the mixture looks slightly uneven at first, continue mixing briefly until it comes together.
Add the prepared dry ingredients in two additions, mixing on low speed after each addition.
Stop mixing as soon as no visible dry flour remains. Avoid overmixing, which can encourage excessive gluten development and affect the finished texture.
Add the white chocolate and fold it through the dough using a spatula until evenly distributed.
Cover the mixing bowl and refrigerate the dough for several hours, preferably overnight. Chilling firms up the butter, makes the dough easier to portion and helps control spreading during baking.
Once chilled, divide the dough into approximately 60g portions using a kitchen scale. Roll each portion gently into a ball.
If you prefer larger cookies, you can portion the dough into 75g or even 150g balls, but these will require different baking times. Avoid using the same baking time for every size.
Preheat the oven to 162°C / 325°F. Line a baking tray with parchment paper.
Arrange the cookie dough balls on the prepared tray, leaving generous space between them because the cookies will spread during baking.
Bake for approximately 14–16 minutes, or until the edges appear set and the centres remain slightly soft. Start checking toward the earlier end of the baking window.
Because black cocoa makes the cookies extremely dark, you won't be able to rely on browning to judge doneness. Instead, look for edges that have set, a surface that is no longer visibly wet and centres that are still slightly soft.
Remove the baking tray from the oven. The cookies may look slightly underbaked in the middle, but they will continue to firm up as they cool on the hot tray.
While the cookies are still hot, carefully place a round cookie cutter or pastry ring around each cookie. Gently swirl it in a circular motion to tidy the edges and encourage a rounder shape.
Lightly sprinkle the cookies with flaky sea salt.
Gently press two small edible candy eyes onto the surface of each warm cookie. Check that your decorations are suitable for contact with hot baked goods. If the eyes don't adhere securely, allow the cookies to cool slightly and attach them with a tiny dab of melted white chocolate.
Leave the cookies on the baking tray for approximately 30 minutes. They will continue setting as they cool, so avoid moving them too early.
Once sufficiently firm, transfer the cookies to a wire rack to finish cooling if necessary.
Serve and enjoy your homemade Noir Cookies with a glass of milk.

Tips:
Use black cocoa powder.
Black cocoa is responsible for the distinctive dark appearance and much of the flavour of these cookies. Regular cocoa powder won't produce the same colour or taste.
Don't expect black cocoa to taste exactly like Oreo cookies.
Black cocoa contributes a dark, roasted cocoa flavour, but the finished taste depends on the entire recipe. Butter, sugar, vanilla and white chocolate all influence the result.
Use good-quality white chocolate.
White chocolate provides sweetness and creamy contrast against the black cocoa. Look for chocolate made with cocoa butter rather than relying on products made primarily with substitute vegetable fats.
Make sure the butter is softened, not melted.
Softened butter should yield when pressed but still hold its shape. Melted butter behaves differently during mixing and can change how the cookies spread.
Weigh the ingredients whenever measurements are given in grams.
Baking is sensitive to ingredient ratios. I recommend using a kitchen scale for the flour, cocoa, butter, sugars, eggs and chocolate.
Don't skip chilling the dough.
Chilling firms up the butter and makes the dough easier to handle. It also helps control spreading during baking.
Don't overmix after adding the flour.
Once the dry ingredients go in, mix only until combined. Excessive mixing can make the cookies tougher.
Watch the texture, not the colour.
These cookies are almost black before they even enter the oven. Look for set edges and slightly soft centres rather than waiting for visible browning.
Use small edible eyes.
I originally experimented with larger edible eyes, but they overwhelmed the cookies. Smaller decorations create the Halloween effect without dominating every bite.
Shape the cookies while they're still hot.
Using a round cookie cutter or pastry ring immediately after baking helps tidy uneven edges. Once the cookies cool and set, this becomes much harder.
Don't move them too early.
Freshly baked cookies are fragile. Allowing them to cool on the baking tray helps the centres set and reduces the risk of breaking them.
The edible eyes are optional.
Leave them off and you've got black cocoa and white chocolate cookies that can be enjoyed throughout the year.
FAQ:
What are Noir Cookies?
Noir Cookies are black cocoa and white chocolate cookies with lightly crisp edges and soft, chewy centres. This Halloween-inspired version is decorated with small edible candy eyes.
What is black cocoa powder?
Black cocoa is cocoa powder that has undergone heavy alkalization, also known as Dutch processing. This gives it a very dark appearance, reduces its acidity and changes its flavour compared with natural cocoa powder.
Do Noir Cookies taste like Oreos?
They have some similar dark cocoa notes because black cocoa is associated with the flavour of dark sandwich-cookie wafers. However, Noir Cookies contain butter, molasses and white chocolate, giving them a different flavour and texture.
Can I substitute regular cocoa powder for black cocoa?
You can experiment, but the results won't be identical. Regular cocoa powder differs in color, acidity and flavor. Natural cocoa may also interact differently with the baking soda, so a complete substitution is not guaranteed to behave the same way.
Why do these cookies contain white chocolate?
White chocolate provides sweetness and creamy richness that balance the deep cocoa flavor. It also creates an interesting visual contrast against the almost-black cookie dough.
Why add molasses?
Molasses contributes moisture, flavour and a subtle depth of sweetness. It complements the brown sugar and dark cocoa without needing to dominate the finished cookie.
Why should I chill the cookie dough?
Chilling firms up the butter, making the dough easier to portion and helping limit excessive spreading during baking. It also gives the ingredients time to hydrate.
Can I freeze the cookie dough?
Yes. Portion the dough into balls and freeze them on a tray until firm. Transfer them to a suitable freezer-safe container or bag.
You can bake the dough from frozen, but the baking time may need adjustment. Use the appearance and texture of the cookies to judge doneness rather than assuming the refrigerated-dough timing will be identical.
Can I make larger Noir Cookies?
Absolutely. You can divide the dough into larger portions, such as 75g or 150g, but larger cookies will require adjusted baking times.
How do I know when black cocoa cookies are baked?
Because the dough is extremely dark, colour isn't a reliable indicator. Look for set edges, a surface that is no longer visibly wet and centres that remain slightly soft. The cookies will continue firming up as they cool.
Why are my cookies spreading too much?
Possible causes include overly warm dough, butter that was too soft or melted, incorrect ingredient measurements, or a baking tray that was already hot when the dough was placed on it.
Why are my cookies dry?
Overbaking is one possible cause. Too much flour or cocoa powder can also affect the texture. Remember that these cookies continue setting after they leave the oven.
Can I leave out the edible eyes?
Of course. They're purely decorative. Without them, these become black cocoa and white chocolate cookies suitable for any occasion.
How should I store Noir Cookies?
Allow the cookies to cool completely before transferring them to an airtight container. Store in a cool, dry place and aim to enjoy them within several days for the best texture. In Singapore's warm, humid climate, avoid leaving them in direct sunlight or near heat sources.
Are Noir Cookies suitable for Halloween parties?
Yes. Their naturally dark appearance and small edible eyes make them a playful Halloween treat without requiring brightly coloured frosting or elaborate decorations.

Dunk the cookies in milk...


Comments